Deployment Using Runbook
Today, We learn how to deploy, deplorable packages manually on local and on Azure Dev-Test servers using run book commands.
Before start to read this blog, we need to understand some key concept which i have copied from Microsoft site.
- Deployable package – A deployable package is a unit of deployment that can be applied to any environment. It can consist of a binary hotfix to the runtime components of Application Object Server (AOS), an updated application package, or a new application package.
- AXUpdateInstaller – AXUpdateInstaller is an executable program that is bundled in the deployable package. When the package is downloaded to a computer, the installer is available.
- Runbook – The deployment runbook is a series of steps that is generated and used to apply the deployable package to the target environment. Some of the steps are automated, and some are manual. AXUpdateInstaller enables these steps to be run one at a time and in the correct order.
Here are the some screenshot with the help of these we can learn how to create deploy-able package.
Open VS and go Dynamics 365 Menu. You can find the Create Deployment package like below screenshot.
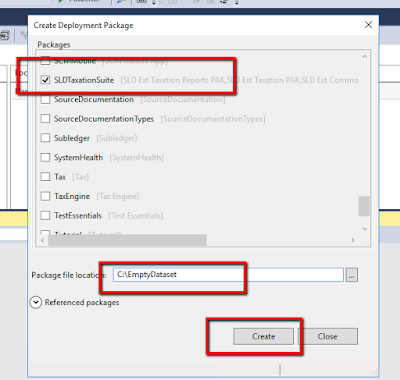
A popup like below will appear, Now select your required models and set the location where you want to save the deployable package, and click create.
After completion of the process, you can find the deployable package on the given path like below.
In my case have renamed the package name as per my naming convention. You can change the name but make sure don't use space in your package name.
Now Paste the deployable package on the targeted machine and unzip the package.
Open CMD and go to the path of the Unzip folder like the below screenshot. in my case path is
C:\backup\DeployablePackage\Package-00130
Following are the run-book command we will use for deployment
AXUpdateInstaller.exe list
AXUpdateInstaller.exe generate -runbookid="Package-00130-runbook" -topologyfile="DefaultTopologyData.xml" -servicemodelfile="DefaultServiceModelData.xml" -runbookfile="Package-00130-runbook.xml"
AXUpdateInstaller.exe import -runbookfile=Package-00130-runbook.xml
AXUpdateInstaller.exe list
AXUpdateInstaller.exe execute -runbookid=Package-00130-runbook
Before you begin to execute the above commands. please make sure to close all instance of VS of the targeted machine.
- AXUpdateInstaller.exe list
This command will show you how may runbook already import in your target machine. check the below screenshot for reference.
- AXUpdateInstaller.exe generate
Based on the topology information in the DefaultTopologyData.xml file, you must generate the runbook file that will provide step-by-step instructions for updating each VM and Make sure your runbook must be unique
Here is an explanation of the parameters that are used in this command:
- [runbookID]– A parameter that is specified by the developer who applies the deployable package.
- [topologyFile]– The path of the DefaultTopologyData.xml file.
- [serviceModelFile]– The path of the DefaultServiceModelData.xml file.
- [runbookFile]– The name of the runbook file to generate (for example, AOSRunbook.xml)
Example
AXUpdateInstaller.exe generate -runbookid="Package-00130-runbook" -topologyfile="DefaultTopologyData.xml" -servicemodelfile="DefaultServiceModelData.xml" -runbookfile="Package-00130-runbook.xml"
Now import the runbook by the following the command
AXUpdateInstaller.exe import -runbookfile=[runbookFile]
Example
AXUpdateInstaller.exe import -runbookfile=Package-00130-runbook.xml
Now Verify that the runbook is loaded successfully or not
We can verify this by this > AXUpdateInstaller.exe list
Please check the below screenshot it loaded in my case successfully
The last step executes the command by below command
AXUpdateInstaller.exe execute -runbookid=[runbookID]
Example
AXUpdateInstaller.exe execute -runbookid=Package-00130-runbook
AXUpdateInstaller updates the runbook file after each step is run on a VM. The runbook also logs information about each step.
Troubleshooting
- In case of failure of any steps, we can execute the same runbook from the same steps where its failed.
AXUpdateInstaller.exe execute -runbookid=[runbookID] -rerunstep=[StepId]
Example
AXUpdateInstaller.exe execute -runbookid=Package-00130-runbook -rerunstep=1
- We can mark the step completed by manually using the below command.
AXUpdateInstaller.exe execute -runbookID=[runbookID] -setstepcomplete=[stepID]
Example
AXUpdateInstaller.exe execute -runbookid=Package-00130-runbook -setstepcomplete=2
Export the runbook.
You can export the runbook by using the below commands.
AXUpdateInstaller.exe export -runbookid=[runbookID] -runbookfile=[runbookFile]
Example
AXUpdateInstaller.exe execute -runbookid=Package-00130-runbook -runbookfile="Package-00130-runbook.xml"


No comments:
Post a Comment