Batch Job Multi threading D365FO AX7


Multi-threaded batch job


Normally, when we schedule our "Run Base Batch" class as a batch job, it will create a single task. Which will be responsible to execute the complete process in a single thread.

But, As you know like AX-2009 and AX-2012. In D365FO We can add multiple AOS servers in a single batch group and they can process multiple tasks simultaneously. 

In this demo, I will show, How to create a multi-threading Batch job.
following are the steps
Step-1 Create a table for demo purposes in our demo we keep the table name is SLD_DemoTable.


Step-2 Create a class with the name SLD_DemoBusinessLogic and write your business logic in this class.
In the demo, I write only to insert records in a table and show you guys how it works.


Reference Code

class SLD_DemoBusinessLogic
{

    public void processInit(VendTable _vend)
    {
        SLD_DemoTable   SLDDemoTable;

        SLDDemoTable.clear();
        SLDDemoTable.VendName=_vend.name();
        SLDDemoTable.VendAccount=_vend.AccountNum;
        SLDDemoTable.insert();

    }

}

Step-3 Create a batch job class with the name SLD_DemoMultiThreadTask.
This class we will use as Task in the main batch job.


Step-4 In this class We Create a getter setter to store vend table buffer;
Step-5 Create an object of our business logic class and execute the method


Reference Code

public class SLD_DemoMultiThreadTask extends RunBaseBatch
{
  
  VendTable ventTableBuffer;
    #DEFINE.CurrentVersion(1)
    #LOCALMACRO.CurrentList
        ventTableBuffer
    #ENDMACRO

        public ClassDescription caption()
       
        {
              ClassDescription ret;
          
              ret = 'Update Multiple Thread task';
          
              return ret;
          
        }

    container pack()
    {
        return [#CurrentVersion,#CurrentList];
    }

    public boolean unpack(container _packedClass)
    {
        int version = conPeek(_packedClass,1);
   
        switch (version)
        {
            case #CurrentVersion:
                [version,#CurrentList] = _packedClass;
                break;
            default:
                return false;
        }
        return true;
    }

    public void pramVendBuffer(VendTable _vend)
    {
        ventTableBuffer=_vend;
    }

    public void run()
    {
        try
        {
            SLD_DemoBusinessLogic       SLDDemoBusinessLogic=new SLD_DemoBusinessLogic();

            SLDDemoBusinessLogic.processInit(ventTableBuffer);
     
        }
        catch
        {
            info(strFmt("%1",xSession::xppCallStack()));
        }
    }

}

Step-6 Now Create the main batch job which will respond to create multiple tasks in the single batch job.


Reference Code

class SLD_DemoMultiThreadBatch extends RunBaseBatch
{
    BatchHeader                             batchHeader;

    VendTable        vendTable;
 

    public static void main(Args args)
    {
        SLD_DemoMultiThreadBatch  objMultiThread = new SLD_DemoMultiThreadBatch();

        if (objMultiThread.prompt())
        {
            objMultiThread.run();
        }
    }

    void run()
    {
        SLD_DemoMultiThreadTask                 SLDDemoMultiThreadTask;
       

        try
        {
          
            while select firstonly10 vendTable
            {
                if(this.isInBatch())
                {
                    if(!batchHeader)
                    {
                        batchHeader = BatchHeader::construct(this.parmCurrentBatch().BatchJobId);
                    }
                    batchHeader.parmCaption("Multiple thread batch jobs");
                    SLDDemoMultiThreadTask =  new SLD_DemoMultiThreadTask();
                    SLDDemoMultiThreadTask.pramVendBuffer(vendTable.data());
                    // add tasks to the batch header
                    batchHeader.addRuntimeTask(SLDDemoMultiThreadTask, this.parmCurrentBatch().RecId);
                }

                else
                {

                    // execute your code here when not running in batch
                }
            }
            if(batchHeader)
            {
                // save the batchheader with added tasks
                batchHeader.save();
            }

        }
        catch
        {
            info(strFmt("%1",xSession::xppCallStack()));
        }
    }

    public container pack()

    {

        return conNull();

    }

    public boolean unpack(container packedClass)

    {

        return true;

    }

}


Step-7 Now create an Action menu item and reference our batch job SLD_DemoMultiThreadBatch .


Step-8 Build and sync database and module and run the job.
Step-9 Navigate to your batch job page and find your job and check Job Task.


Step-10  before execution of the batch job check the demo table. 
you can check the below screenshot currently table is empty.


After execution of the job table filled with vendors' names.


Please feel free to contact me if you are facing any issues during the implementation of this blog


Flush the AOS cache from code. AX-2012

Flush the AOS cache from code.  AX-2012 


Well while working on a old project my project lead shared with me a very nice little trick. 


Well the trick is to copy these three menu items, and then change the run from property to server. Now you can launch these menu items, and they will run on the server, therefore clearing the AOD, sys data, and dictionary, causing a refresh. 

Menu item you can find on the below path
[Under Menu items > Action]

  1.  SysFlushAOD
  2.  SysFlushData
  3.  SysFlushDictionary

Task Recorder D365FO


Task Recorder D365FO


In D365FO Microsoft Introduce a really built in tool Task recording. its allow us to record the step even we can save the steps as documentation.

with simple following steps you can use Task recording as well.


As the following picture shows, the Task Recorder is found under Settings: in the ribbon:
Once in the Task Recorder, you have the options to create a new recording, play back a recording or edit an existing recording as the following picture show. 


Let us start by recording a new Task. 

Give the guide a descriptive name and press the Start button.
The task recorder is now in recording mode. You can stop the recording by clicking on the Stop button in the ribbon.
I would like to structure my Task Guide in sections, so I start my creating a sub-task:


In my demo i am performing some action and you can check in the screen shot Task recorder is recording every steps.

Like 
1st I closed a open page
2nd open Worker from payroll 

Step-1

Step-2


Step-3 Stop


There are two options available to save record.
Word documentation 
Save file in AXtr format.


The database principal owns a fulltext catalog in the database, and cannot be dropped.


The database principal owns a fulltext catalog in the database, and cannot be dropped.

Problem


Msg 15138, Level 16, State 1, Line 1
    The database principal owns a fulltext catalog in the database, and cannot be dropped.

Resolution 


Find the catalog name and change the owner ship like below

Run the command on your database 
select * from sys.fulltext_catalogs


Now change the ownership with below script

Example
ALTER AUTHORIZATION ON Fulltext Catalog::[CatalogName] TO [dbo];  


Script should be in my case like

ALTER AUTHORIZATION ON Fulltext Catalog::[COMMERCEFULLTEXTCATALOG] TO [dbo];  
ALTER AUTHORIZATION ON Fulltext Catalog::[SqlTempDBForSync_catalog] TO [dbo];  


Private, Protected and Public attribute access in Class Extension


Private, Protected, and Public attribute access in Class Extension


lots of developers faced the issue on the daily basis during development to access private, protected, and public methods.

As everyone knows that public attribute is available to access with the class instance.
but protected and private attributes are a little difficult to access.

In this demo, we show how to access all 3 access modifiers using the class extension.


Step-1 Create a class SLD_DemoClass.
Step-2 Declare 3 variables like below and one public method to set values in these variables.


Step-3 Now create an Extension of this class with SLD_DemoClass_Extension.
Step-4 Create a getter setter to access the variable.


for public and protected methods it's easy to access just to write simple getter setter method and can access these public methods using class instance.

Step-5 To Access the private attributes in-class extension, We need to use the C# reflection library.

Step-6 Now write the below code to access the private attribute on run-time.


following is the screenshot of the complete code of the extension class.


Step-7 Now create a run-able class and action menu item to execute this code.


Step-8 perform build & Sync and login on D365FO for verification.


You can check in the screenshot all 3  protected, private, and public attributes values in the info message.


Please feel free to contact me if you are facing any issues during the implementation of this blog.


Upgrade Environment using LCS D365


Upgrade Environment using LCS D365.


You can upgrade your 2-Tier environment to the latest build using LCS.


Step-1 Navigate to your required Environment and click on maintain.
Step-2 Now click on upgrade a popup window will appear.


Step-3 Popup window contains 3 fields to be filled.


  1. Target Environment 
  2. Preferred downtime start date
  3. Preferred downtime start time

Select the Build release on which you want to upgrade your environment and provide downtime as per your feasibility then click next. 


Following is the filled screenshot for your reference.


Step-4 Select the application version from the new window and click next.


Step-5 Now select the database type from the next window.

Three types are available 
  1. None 
  2. Demo 
  3. Public sector data


Step-6 select a custom package if you want to deploy with this upgrade.


Step-7 Enter the email address of the persons who will be notified of every action on the environment.


Step-8  select environment administrator. Only users will appear in the drop-down those who have administrator rights on Project and LCS.


Step-9 verify the summary


Step-10 Now enter your Account name in the text box and click save.


Service will submit to Microsoft and they will start working on the given time window.


Please feel free to contact me if you are facing any issues during the implementation of this blog.


Deploy package using LCS


Deploy package using LCS


Using the following steps you can create the deployable package and deploy it through LCS.

Step-1  Open Visual studio and click on Dynamics365 Menu and select create deployment package from the deploy menu item.


Step-2 Select your model and set the output path of the model and click OK.


Step-3 Login to LCS then navigates to your project.
Ste-4 click on the hamburger icon and select Asset library.


Step-5 Now select software deploy-able package and click on the + icon to add your custom package.


Step-6 Enter the package name and description. would be great if you are follow any naming sequence for packages.

Step-7 Click on Add file button to upload your deployable package.


Step-8 Now click on browse and select package then click on uplaod.


Step-9 You can find the package in the tab of software deploy-able tab Once the package is uploaded successfully.

Step-10 Once LCS mark package as valid. then go to your environment.


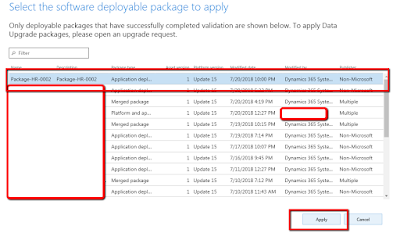
Step-11 Now click on Maintain and select apply the update.


Step-12 Select your package and click on apply.


Package deployment will start in few seconds. LCS will show you the progress of every step.


Once the package is completed sign Off the package, So it will visible to you on production deployment as well.


Please feel free to contact me if you are facing any issues during the implementation of this blog.


Virtual Fields Vs Computed Fields

  Virtual Field: A virtual field in D365FO is a field that doesn't have a direct representation in the database. It's a field that y...